Friday, December 2, 2011

Gift Tags

Just wanted to share a pic of the gift tags I made this year for my gifts.  I used bright paper, fun stamps and some glitter paint to make them.


I love wrapping presents don't you?

Thursday, November 10, 2011

DIY Sparkly Headband

I've been really into hair accessories lately, can you tell? Especially anything that sparkles.  I saw this great ribbon at a craftstore and decided to buy it and make it into a headband.  My friend E came over and we had a little headband DIY get together last night, it was fun, she is also the model for this post, thx E!!  So here goes, a DIY sparkly headband...

Sparkly Headband!


Things You will Need:

1/2 yard of Sparkly ribbon

3"-5" of black 1/2" elastic. (the amount of elastic you need really depends on how stretchy your sparkly ribbon is, mine was kind of stretchy so I was able to get away with using only 3")

Hot Glue

Scissors

Ruler

Step-By-Step How To:

Things you will need.

Close-up of the sparkly ribbon I'm using.

Cut 3" of the elastic.

My ribbon was slightly shorter than 1/2 yard.

Add some hot glue to the elastic.

Place the back side of the ribbon on the elastic.

I glued the elastic about 1/2" in.

Glue the other side of the ribbon on to the elastic and that's it!
Note: Everyone's head is a different size so if this ribbon is too small for you, use a longer elastic, if it is too big cut the sparkly ribbon or the elastic shorter and re-glue.

Now you're ready to wear it!
What are some of your favorite hair accessories?

Friday, November 4, 2011

Animal Print Bow Gloves

It's getting so cold here in Oregon, it feels like winter just snuck up on me!  I pretty much can't leave the house without wearing a sweater, a heavy coat, a scarf and some gloves.  I always feel like my gloves are super bland so my friend E and I decided to spice them up with some animal print bows.  I saw bows on gloves in a number of stores at the mall and decided it would be easy to embellish some of my plain gloves at home.  It's a super quick way to make your gloves look new again, enjoy!


Bow gloves.
They look so sophisticated with their little bow ties!

Things You Will Need:

A pair of gloves

Ribbon (1/2 yard)

Scissors

Hot Glue

Step-By-Step How To:

Things you will need.

Make the bows!
In order to make the bow I used a youtube tutorial found HERE!!.
Note: You can make any type of bow,
I just really liked the bows in the video above.

Add hot glue to the back of the bow.

Press the bow on the glove where you like it to be placed.
Tip: Try the glove on first and mark lightly with a pen or pencil where you would like the bow to be placed.  If you are not careful the bow may end up to one side, since some gloves stretch more towards one side than others.

That's it! Now it's time to wear them!

Wednesday, October 26, 2011

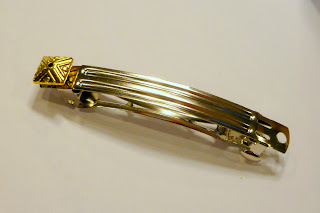
DIY Barrette

I love hair accessories especially since they distract attention from my messy hair.   I have curly hair which means regardless of how much I comb my hair it still looks messy 90% of the time.  Anyhow, hair accessories can be expensive so I decided to make some of my own, I hope you guys enjoy this tutorial as much as I do!


Barrettes!  I love how antique these look.

Things You Will Need:

- 80 mm Barrettes

- Gold, Brass, or Silver Metal Beads (As needed)

- Super Glue

Step-By-Step How To:
Things you will need.

Count out the number of beads that you need to cover the barrette. 
The beads I used were pretty large so I only needed 8.

Add a dot of super glue.

Place a bead on top of the dot of super glue and hold it there for 15 seconds.

Let the bead dry for another 15 seconds or until the bead adheres.

Continue adding the beads with super glue until the entire barrette is covered.

Let the barrette dry completely before wearing.

Wear it as you wish!  I like to wear it with a bun.
*Thank you for modeling E!!

Saturday, October 8, 2011

Candy Corn Vases

This awesome idea comes from The Swell Life, it looked so cool that me and my friends decided to give it a go!  They were so much fun to make and you can use any type of glass bottle or jar to make them. 

Candy Corn Vases!


Things You will Need:

Glass Bottles and/or Jars

White Spray Paint (make sure you can use them on glass)

Orange Spray Paint (make sure you can use them on glass)

Yellow Spray Paint (make sure you can use them on glass)

A large box (big enough to fit your largest bottle/jar)

A large garbage bag

Mask

Gloves

Fall Flowers (optional)

Step-by-Step How To:

Things you will need, not pictured: gloves and fall flowers.

Before you start spray painting put on your mask and gloves.
Next set-up your spray painting station.
Wrap a table with a plastic bag and place the box with one side open on the table as shown in the image above.
 Spray painting within the box will contain the mess and allow for easier clean-up.

Spray paint the top half of the bottle white. 
This may require several coats.
I spray painted the bottle in sections, rotating the bottle with my finger so that the bottle would be painted all the way around.

Spray paint the middle portion of the bottle yellow.

Spray paint the bottom portion of the bottle orange.

Let them dry for 2-4 hours.

Decorate your house with them!
Fun and easy right!? Happy Decorating!

Monday, March 28, 2011

Spring Magnets

I have been meaning to post this project for a while now but I have been pretty busy this past month! I love making these magnets they are quick and easy to do and they would make great gifts for people too.
Spring Magnets!
Things You  Will Need:
Glass Beads, Diameter 1.25" (Amount varies, depending on how many you want to make)
Magnets, Diameter = 3/4" (Amount varies, depending on how many you want to make)
Mod Podge
Colorful paper
Stickers
Scissors
Pencil
Brush
Hot Glue Gun + Glue

Step-By-Step How To:

Things you need!
Missing: Hot Glue Gun!
Note: You don't need that much paper, since the glass beads are so small! I just put it there to show the variety of color and designs you can use :)
 
1) Trace the glass drop on to a piece of paper.
2) Cut it out
3) Trim the edges so that the bead covers the paper properly.

1) Cover the  paper with mod podge,  then lay the paper (the side with mod podge) on the glass drop
2) After placing the paper on the glass drop cover it with mod podge, making sure to cover the edges well.
3) Wait for it to dry

Add some hot glue to the magnet and press it down on the back of the glass drop.

Add stickers if you wish!
That's it! Wasn't that easy?
Smile :)
 Hope you guys enjoy making these!

Wednesday, February 16, 2011

Picture Frame Jewelry Holder

I've seen a lot of different types of picture frame jewelry holders on-line, some made with ribbon, cork board, and some with wire.  They are such a cute fun way to display your jewelry, I decided to make one for my room.  I love looking at my jewelry being displayed, it encourages me to wear it more often :) Anyway it was super easy and cheap to make this small jewelry holder and no glue was needed!
Picture Frame Jewelry Holder
Things You Will Need:

Picture Frame **You can use any size you want, the one I made was 4"x6" but you can definitely make it bigger, I'm actually tempted to make a larger one myself
Ribbon  (enough of it to tie around the picture frame)
Paper (enough to cover the back of the picture frame)
Pencil
Scissors

Step-By-Step How To:

Things you will need.
Take apart the frame.  You will not need the glass during this project so you can just set it aside.
Tie the ribbon around the frame.
I tied the extra ribbon around the frame.

Trace the back of the frame on to a piece of paper.
Cut the paper out!
Place the paper on the back of the frame.

Put the frame back together again (minus the glass).

This is what the finished product looks like.  If you use a larger frame you can add more ribbon lines so it can hold more jewelry.

Hang up your jewelry and enjoy!
 What are some fun craft projects you like to do?