Showing posts with label DIY. Show all posts

Monday, October 22, 2012

DIY Lips Shirt

Kissed all over.  This is exactly how this shirt makes me feel!  I have been seeing shirts, sweaters and jewelry with lips everywhere so I just HAD to make one for myself.  I hope you guys love this shirt as much as I do!


Things You Will Need: 

Shirt or sweater (I got this shirt at Target for only $2 on the clearance rack!)

Red Fabric Paint (I used this one in Crimson Red)

Lips Stamp (Here is a similar one on amazon, I bought mine at a garage sale)

Paint Brush

Cardboard

Paper plate (to squeeze your paint on!)

Step-by-Step How To: 
Gather your supplies!
Place the cardboard in the shirt.  This will prevent the paint from bleeding to the other side.  You can cut small pieces of cardboard and place it inside the sleeves too. 


Place paint on the stamp with a brush.  Brush the paint on vertically so that you mimic the lines on real lips.
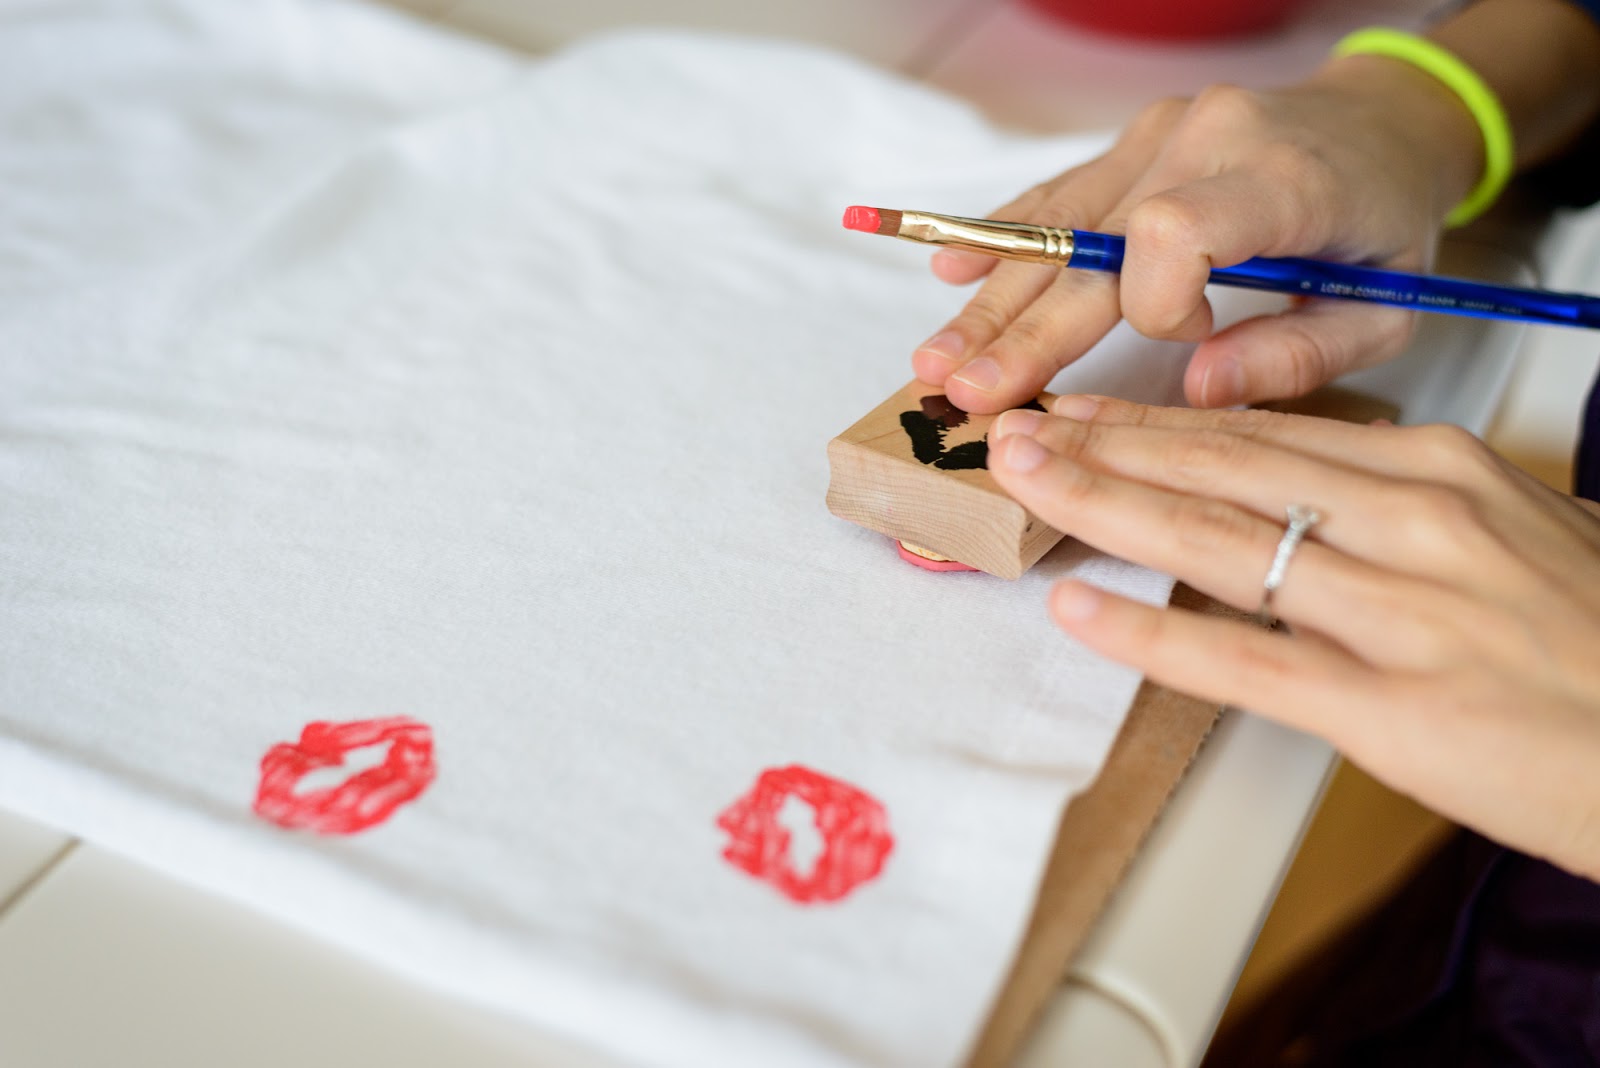
Carefully stamp it on your shirt
Lift up your stamp!  Ta-da, instant lips!  Let the front of the shirt dry completely before turning it over and doing the back side.
Lips, lips, lips!!!
I hope you guys liked this tutorial! Wouldn't it be fun to draw little fangs on the lips and make it vampire inspired?  I want to add lips to everything now!

Wednesday, October 3, 2012

DIY Halloween Potion Bag

I feel like I've been in the Halloween mood since mid-September!  I made this bag for EC's birthday, she is really into the Halloween jars with fun labels so I thought a Halloween themed gift bag would be the perfect addition.  This bag literally took me like 5 minutes to make, the hardest part was probably deciding which label to use! 


Things You Will Need: 

paper shopping bag or a gift bag will work too (yay for recycling, ha!)

glue stick

scissors or a paper cutter

black paper

Halloween potions and bottle labels I printed mine from this website: http://www.fantasyjr.com/printable-halloween-labels/

Step-By-Step How To: 

Gather your supplies and cut out your labels!

Make sure you cut the backing big enough to cover any sign or image on your bag.

Cut your potion labels and black paper

Apply some glue on the potion label

Paste it on the black backing you created, make sure it is centered!

Now glue it one on each side of the back and that's it!!


That's all there is to it!  This bag would be great to decorate your house for Halloween, you can place fun jars or black flowers inside or you can use it to place a gift inside like I did.

I hope you guys are having a great October so far!

~DD

Wednesday, August 29, 2012

DIY J.Crew Heart Sweater

I feel like I can't get enough of this J.Crew heart sweater but I was definitely not into the price so I decided to make my own with a little fabric paint and a $12 sweater from Forever 21.


Things You Will Need:

- Fabric paint, I used this fun glitter one
- Sweater
- Paint Brush
- Cardboard
- Paper
- Pencil
- Scissors
- Tape

Step-By-Step How To:

Gather your supplies and draw out a random heart shape, it's ok if your heart is not symmetrical.

Cut out your heart, now you have a template to paint with.

Place the cardboard inside the sweater, underneath the area you plan to paint.

Tape your template on the sweater.


Start painting the heart, be sure to add a very thin layer of paint, you don't want your heart to be too stiff once it dries.

Smooth out any lumps in the paint.

Carefully remove the paper template

Now smooth out the edges and let it dry overnight.
Now you're ready to wear it!

I'm pretty happy with how this turned out, I can definitely see myself wearing this sweater all winter.  I think the heart would look fun on a t-shirt or on a tote bag! 

Thursday, August 9, 2012

DIY Polka-Dot T-Shirt Show & Tell

Just wanted to show you guys how the polka dot shirt looks on, I've literally been wearing it with everything!  I was also happy to see that when I washed it the spots stayed on perfectly!  See the tutorial here.


Hope everyone is having a great week!

Thursday, August 2, 2012

DIY Polka-Dot Shirt

I was totally inspired by the j.crew fall clothing line when making this shirt.  I have been seeing polka-dots everywhere so I decided to make my own with a plain white t-shirt, some gold fabric paint and a round sponge.  The shirt took me less than a hour to make, it's such a fun top I can definitely see myself wearing this now and during fall.


Things You Will Need: 

Fabric Paint - I used gold paint but you can  use any color you wish

Sponge on a stick 3/4"

White t-shirt - I bought this one at wal-mart for $5.58, there is a similar one here.

Hard board

Paper Plate

Paint Brush (optional)


Step-By-Step How To: 

Gather your supplies!

Close-up of paint and sponge.

Place some paint on a little paper plate and dab the sponge in it, make sure the sponge is not drenched in paint.  The layer of paint on the sponge should be thin.

Place the cutting board/hard board underneath the area you will be working.  Next, firmly press down the sponge on the t-shirt.  Another thing I did is that I twisted the sponge around as I was firmly pressing it down on the shirt, this helped my dots came out nice and round.

Now you have a dot!

Continue to add dots until the whole shirt is covered in polka-dots.
If you need to fix the edges of the dots use a paint brush to touch them up, this guarantees much rounder dots.

Let dry for a couple of hours or until the paint is completely dry!  Now you are ready to wear it!


Wednesday, July 4, 2012

DIY Star Shorts Part 2

Happy 4th of July everyone!

Just thought I'd share a pic of what the DIY star-printed shorts looked like on!


I hope you are all having a wonderful Independence Day!
~DD

Tuesday, July 3, 2012

DIY Star Shorts

I have totally been lusting over these Current/Elliot Start Printed Shorts but I definitely did not want to spend that much money on them so I sought out to make my own pair!  I'm super glad I did the total cost of the shorts ended up being about $15 and they only took about 1 hour to make.  I'm tempted to stamp stars on a t-shirt or some tote bags, ahh the possibilities are endless!!

DIY Star Printed Shorts

Things You Will Need:

A pair of shorts with plain pockets (I bought mine at Old Navy for $10, they are the Diva shorts, see here)

White fabric paint

Star Stamp

Brush

Masking tape

A cutting board or book

Step-By-Step How To: 

Supplies

Star stamp

Fabric Paint

This paint goes a long way so place a little bit on a tray or a disposable plate like I did here.

Use a brush to apply it to your stamp that way the star is evenly coated with a thin coat of paint.

Stamp it on your denim!

And viola! A star is born ;)

For the stars to turn out more even place a cutting board underneath the area you are stamping.

If you only want a portion of the star to show up on the edges, line the edge you do not want stamped with masking tape prior to stamping a star on to the area.

Stamp it!

Lightly fill in any areas that were not covered by the stamp.

Partial stars.  Continuing stamping until you are satisfied with the number of stars on your shorts.
Star shorts! Front view.

Back view.
That's all there is to it!! I can't wait to wear these tomorrow for the 4th of July!!

Have a great 4th of July everyone!

~DD